

How To Install Roman Blinds

Within fit
Getting started
Be careful non to impairment the blind when removing the packaging and cheque that the following parts are included:
- Roman blind
- Cocky-tapping screws (number depends on the width of the blind)
- Wall cleat
Tools required:
- Pencil
- Tape measure
- Power drill with a 3mm drill flake
- #2 foursquare bulldoze for the fixing screws
- #1 square drive for wall cleat
Lay your roman blind upside downwards on a clean surface. Count the number of cocky-borer screws provided; there should be ane less than the number of cords used in the blind.
Please note: No brackets are required for this type of blind; but fix the blind's billy direct to the inside superlative of the window frame.
Illustrated steps
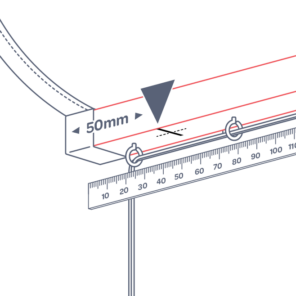
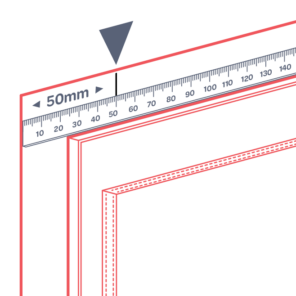
Pace 1
Measure 50mm in from each cease and place a mark on the underside of the baton.
Mark the location of the remaining screws, spaced evenly between the two ends.

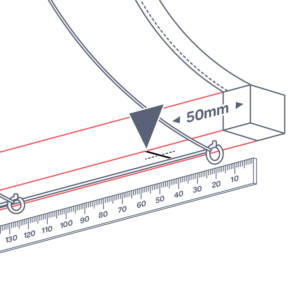
Step two
Predrill holes through the baton and fabric at each mark using a 3mm bit and start a screw into each pigsty.
Step 3
Decide how far back in the sill you want the blind to sit. Holding the blind in place, make a marker at the back of the billy to employ as a guide when fixing. Identify marks on both sides of the window at the same distance back.

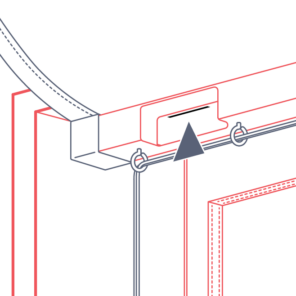
Step 4
Holding the bullheaded in place with one hand, line up the back of the wooden billy with the marks on the window frame and drive the middle screw (or spiral closet to the middle) through the baton and into the window frame. Repeat with all remaining screws.
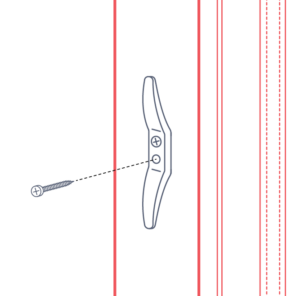
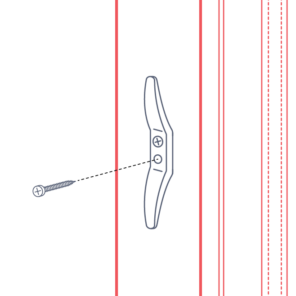
Step five
Fix the cleat to the wall or window frame below the control end in such a way that it doesn't interfere with the operation of the bullheaded, notwithstanding allows for winding the backlog cord on when the bullheaded is in the raised position.
- Download guide
Exterior fit
Getting started
Be conscientious not to impairment the bullheaded when removing the packaging and cheque that the following parts are included:
- Roman Blind
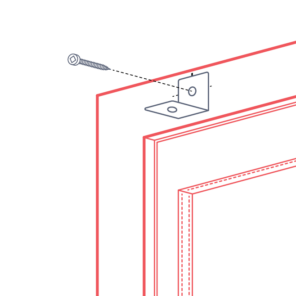
- L-brackets with 1 ten 50mm screw per bracket (number of brackets depends on the width of the blind)
- Self-tapping 15mm screws, one per bracket
- Wall cleat with screws
Tools required:
- Pencil
- Tape mensurate
- Power drill with a 3mm drill bit
- #two square bulldoze for the mounting brackets
- #1 square drive for the wall cleat
Illustrated steps
Step 1
Detect the position y'all originally measured from when ordering your bullheaded.
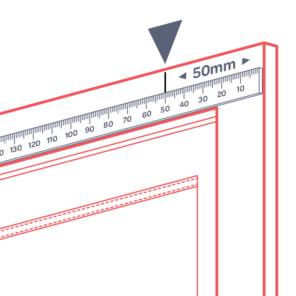
At this height, using the outer edge of the window frame as a guide, measure out inward and mark 50mm; do this on both sides. This is where your stop brackets will go.
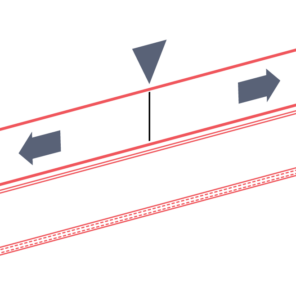
Step 2
Space the remaining brackets evenly between the end brackets and mark the wall, conscientious to not interfere with the cords and eyes in the baton.
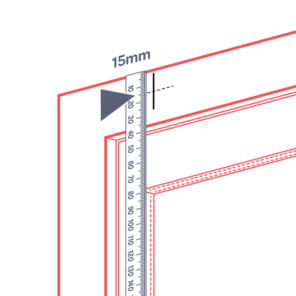
Stride iii
Next, measure downwardly 15mm from where the top of the bullheaded will sit to create a cross on the kickoff marks.
Tip: If installing a floor length bullheaded, measure upward from the floor the length of the blind drop less 20mm instead.
Step iv
Pre-drill holes using a 3mm drill bit on the crosses and fix a bracket at each site.
Ideally spiral into wood behind the wall lining (plasterboard). If no wood is available hither, check at locations 100mm and 150mm in from each end and adhere brackets here if you lot find wood. If there is notwithstanding no wood available, place a mark at the first available wood and another 50mm in from each end.
Tip: Employ a stud finder to detect wood.
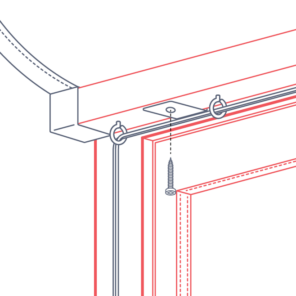
Step five
Attach the bullheaded to the L-brackets by screwing up through the bottom of the bracket into the baton using the 15mm cocky-tapping screws provided.
Step 6
Fix the cleat to the wall or window frame below the control end in a mode that doesn't interfere with the operation of the blind nonetheless allows for winding the excess cord on when the blind is in the raised position.
Notation: Our illustrations evidence the blind fitting to the window frame. If y'all measured to fit to the wall higher up the window frame, measure from where you originally measured when ordering.
- Download guide

Source: https://www.bargainblinds.co.nz/measure-and-install/how-to-install-corded-roman-blinds
Posted by: bowmanearthey.blogspot.com
0 Response to "How To Install Roman Blinds"
Post a Comment