

How To Install Nes Emulator On Raspberry Pi
Fed up with trying to get your hands on a Nintendo NES Archetype Edition? Praying for a SNES Classic? Terminate wasting fourth dimension, and build your ain, using a Raspberry Pi and the RetroPie emulation suite. Here'due south how to do it.
Building Your Own NES or SNES Classic Edition
While the Nintendo NES Classic Edition and the SNES variant might be easier to come by these days, you don't have to wait for the right bargain.
You can build your ain Nintendo NES Classic Edition today, using a low cost Raspberry Pi reckoner! We recommend a Raspberry Pi iii for the best results, although you lot tin can squeeze out some more juice using a Raspberry Pi three B+ (although this might be less stable).
You'll likewise need:
- 8 GB microSD card
- Reliable power supply
- Etcher SD carte writing software from etcher.io
- Filezilla FTP client software from filezilla-project.org
- HDMI cable
- Nintendo-style USB game controller(s)
- Optional USB keyboard (for initial setup)
- Suitable case (for that authentic look)
Suitable game controllers tin can be bought online, as can Nintendo and NES way cases. Some Amazon sellers parcel up the Raspberry Pi 3 with a suitable example and game controllers.
Before you brainstorm, make sure your Raspberry Pi is continued to your TV, and the game controllers are ready to use. The power supply should be within easy reach, but disconnected. You should have downloaded the suggested software, and have the SD card to hand.
Playing NES and SNES Classic Games on Raspberry Pi
Thanks to retro gaming software, it'southward easy to install and play classic NES and SNES games on your Raspberry Pi. Dreaming of boot back with Super Mario Bros 2 or The Legend of Zelda? Want to tackle Donkey Kong Country and try to consummate it at last?
Yous can!

However, there is a caveat. Y'all'll need ROMs for these games, snapshots of the data from the original cartridges. If you're not able to make these yourself (it's not easy), and so you lot'll need to find the files online. Similarly, you'll too need BIOS files, which permit the emulators to run.
You'll find details nigh the Nintendo Entertainment System BIOS files in the RetroPie wiki: NES BIOS wiki page.
Note that the SNES does not require a BIOS file.
Unfortunately, nosotros tin can't tell y'all where to find ROMs. Most games are protected by copyright; indeed, unless you actually own a copy of the original game, you shouldn't be using a ROM file.
However, you will find what yous need using your favored search engine, but beware. In 2022, Nintendo made it hard for popular retro gaming sites to share its classic games. As such, your ROM search might take some time.
(If all of this sounds a bit frustrating, and you however want some retro gaming, don't worry. We've listed 10 classic games you can play on the Raspberry Pi without emulation.)
Installing RetroPie on Your Raspberry Pi
Once you've gathered a few ROMs, you'll want to play them. While several retro gaming systems are available for the Raspberry Pi, the all-time pick for Nintendo games is RetroPie.
To install this, you'll need to head to retropie.org.united kingdom and download the correct version for your Raspberry Pi. As noted, the best results can be enjoyed with a Raspberry Pi three, although older versions volition also run Nintendo games.
To install an operating system on your Raspberry Pi, the Etcher image writing software is ideal. Download and install it from the link above before proceeding.
Brand sure you know where you lot've downloaded RetroPie to, then insert your Pi'southward microSD card into your PC's menu reader.
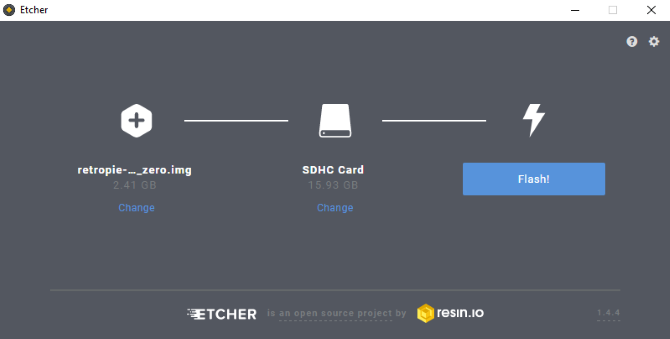
Adjacent, open up Etcher, and under Select image scan to the disk image for RetroPie, and select it. Confirm your microSD is listed under Select drive (click the button and browse to it if not), then Flash to begin writing RetroPie to your microSD menu. Etcher will notify y'all when the process is complete, at which point you should safely eject the carte du jour, insert it into your Raspberry Pi, and boot upwardly.
You lot'll find more than particular in our guide to installing a Raspberry Pi operating organization.
What if you're using your Raspberry Pi for a particular purpose and don't want to format the SD bill of fare? You're in luck; you tin install RetroPie as an app on your Raspberry Pi, and load your emulation software every bit and when you need it.
When y'all boot RetroPie, you'll be prompted to configure your game controller. Follow this process to ensure the controller is correctly fix, so you're able to navigate the EmulationStation user interface. This is the "front" of RetroPie, and organizes your emulators and ROMs for easy launching.
Turning Your Raspberry Pi Into an NES
With RetroPie installed, you'll need to somehow copy the ROM and BIOS files you downloaded to your Raspberry Pi. The easiest way to practice this is via an FTP client with SFTP support. FileZilla is probably your best bet, but you'll need to first enable SSH on the Raspberry Pi.
Other methods of copying information to a Raspberry Pi are available.
Enable SSH by using your controller (or keyboard) to browse to the Configuration bill of fare, and select raspi-config. This opens the Raspberry Pi Configuration screen, where you should select Interfacing Options > SSH. Choose Enable, and then reboot your Raspberry Pi.
When the estimator restarts, open FileZilla on your PC and select Site Manager. Here, click New site and enter the credentials. Y'all'll need the device's IP address, (found in the Configuration menu) and the default username and password. This is set up to the default Raspbian username and password of pi and raspberry.

With the SFTP option selected, scan the contents of your PC (left pane) and your Raspberry Pi (right pane). Using FTP is simple: browse for the files you want to copy on the left, and find the target directory on the right. Then just double click the files to brainstorm copying.
To run your NES games with RetroPie, copy the ROM files to the /nes/ directory. Don't forget the BIOS file, which should be copied into the /bios/ folder.
When everything is copied across, use your game controller to select the Menu > Quit option. Select Restart EmulationStation, and wait. Moments afterward, you'll come across your NES games set up to play on your Raspberry Pi!
Running SNES Games on Your Raspberry Pi
To run SNES games with RetroPie, follow the same steps as to a higher place, but copy the SNES files into the /snes/ directory.
Once more, it'south a proficient thought to reboot once the files are copied beyond. When you're done, RetroPie volition take a SNES carte, with your games listed, set to play!
Running into problems? Check our RetroPie performance tips.
Yous Just Congenital a Raspberry Pi Gaming Panel!
The Nintendo NES Classic Edition is difficult to find, and expensive. It also doesn't play SNES titles.
Meanwhile, Raspberry Pi is easy to become concord of, affordable, and can play NES and SNES titles. Oh, and it will also let yous relish PlayStation games, Sega Dreamcast games, and fifty-fifty Commodore 64 games, among many others!
Thanks to the small size of the Pi, meanwhile, you can use it in a diverseness of means for gaming, from installing into a game controller to building your own arcade motorcar. Fifty-fifty though your Raspberry Pi looks like a mini Nintendo, you tin can still utilize it to play pretty much any videogame.
Nosotros hope you lot like the items we recommend and discuss! MUO has affiliate and sponsored partnerships, so nosotros receive a share of the revenue from some of your purchases. This won't bear upon the price y'all pay and helps united states offering the best product recommendations.
About The Writer


Source: https://www.makeuseof.com/tag/raspberry-pi-nes-emulator-retropie/
Posted by: bowmanearthey.blogspot.com
0 Response to "How To Install Nes Emulator On Raspberry Pi"
Post a Comment